Starting fresh in 2023

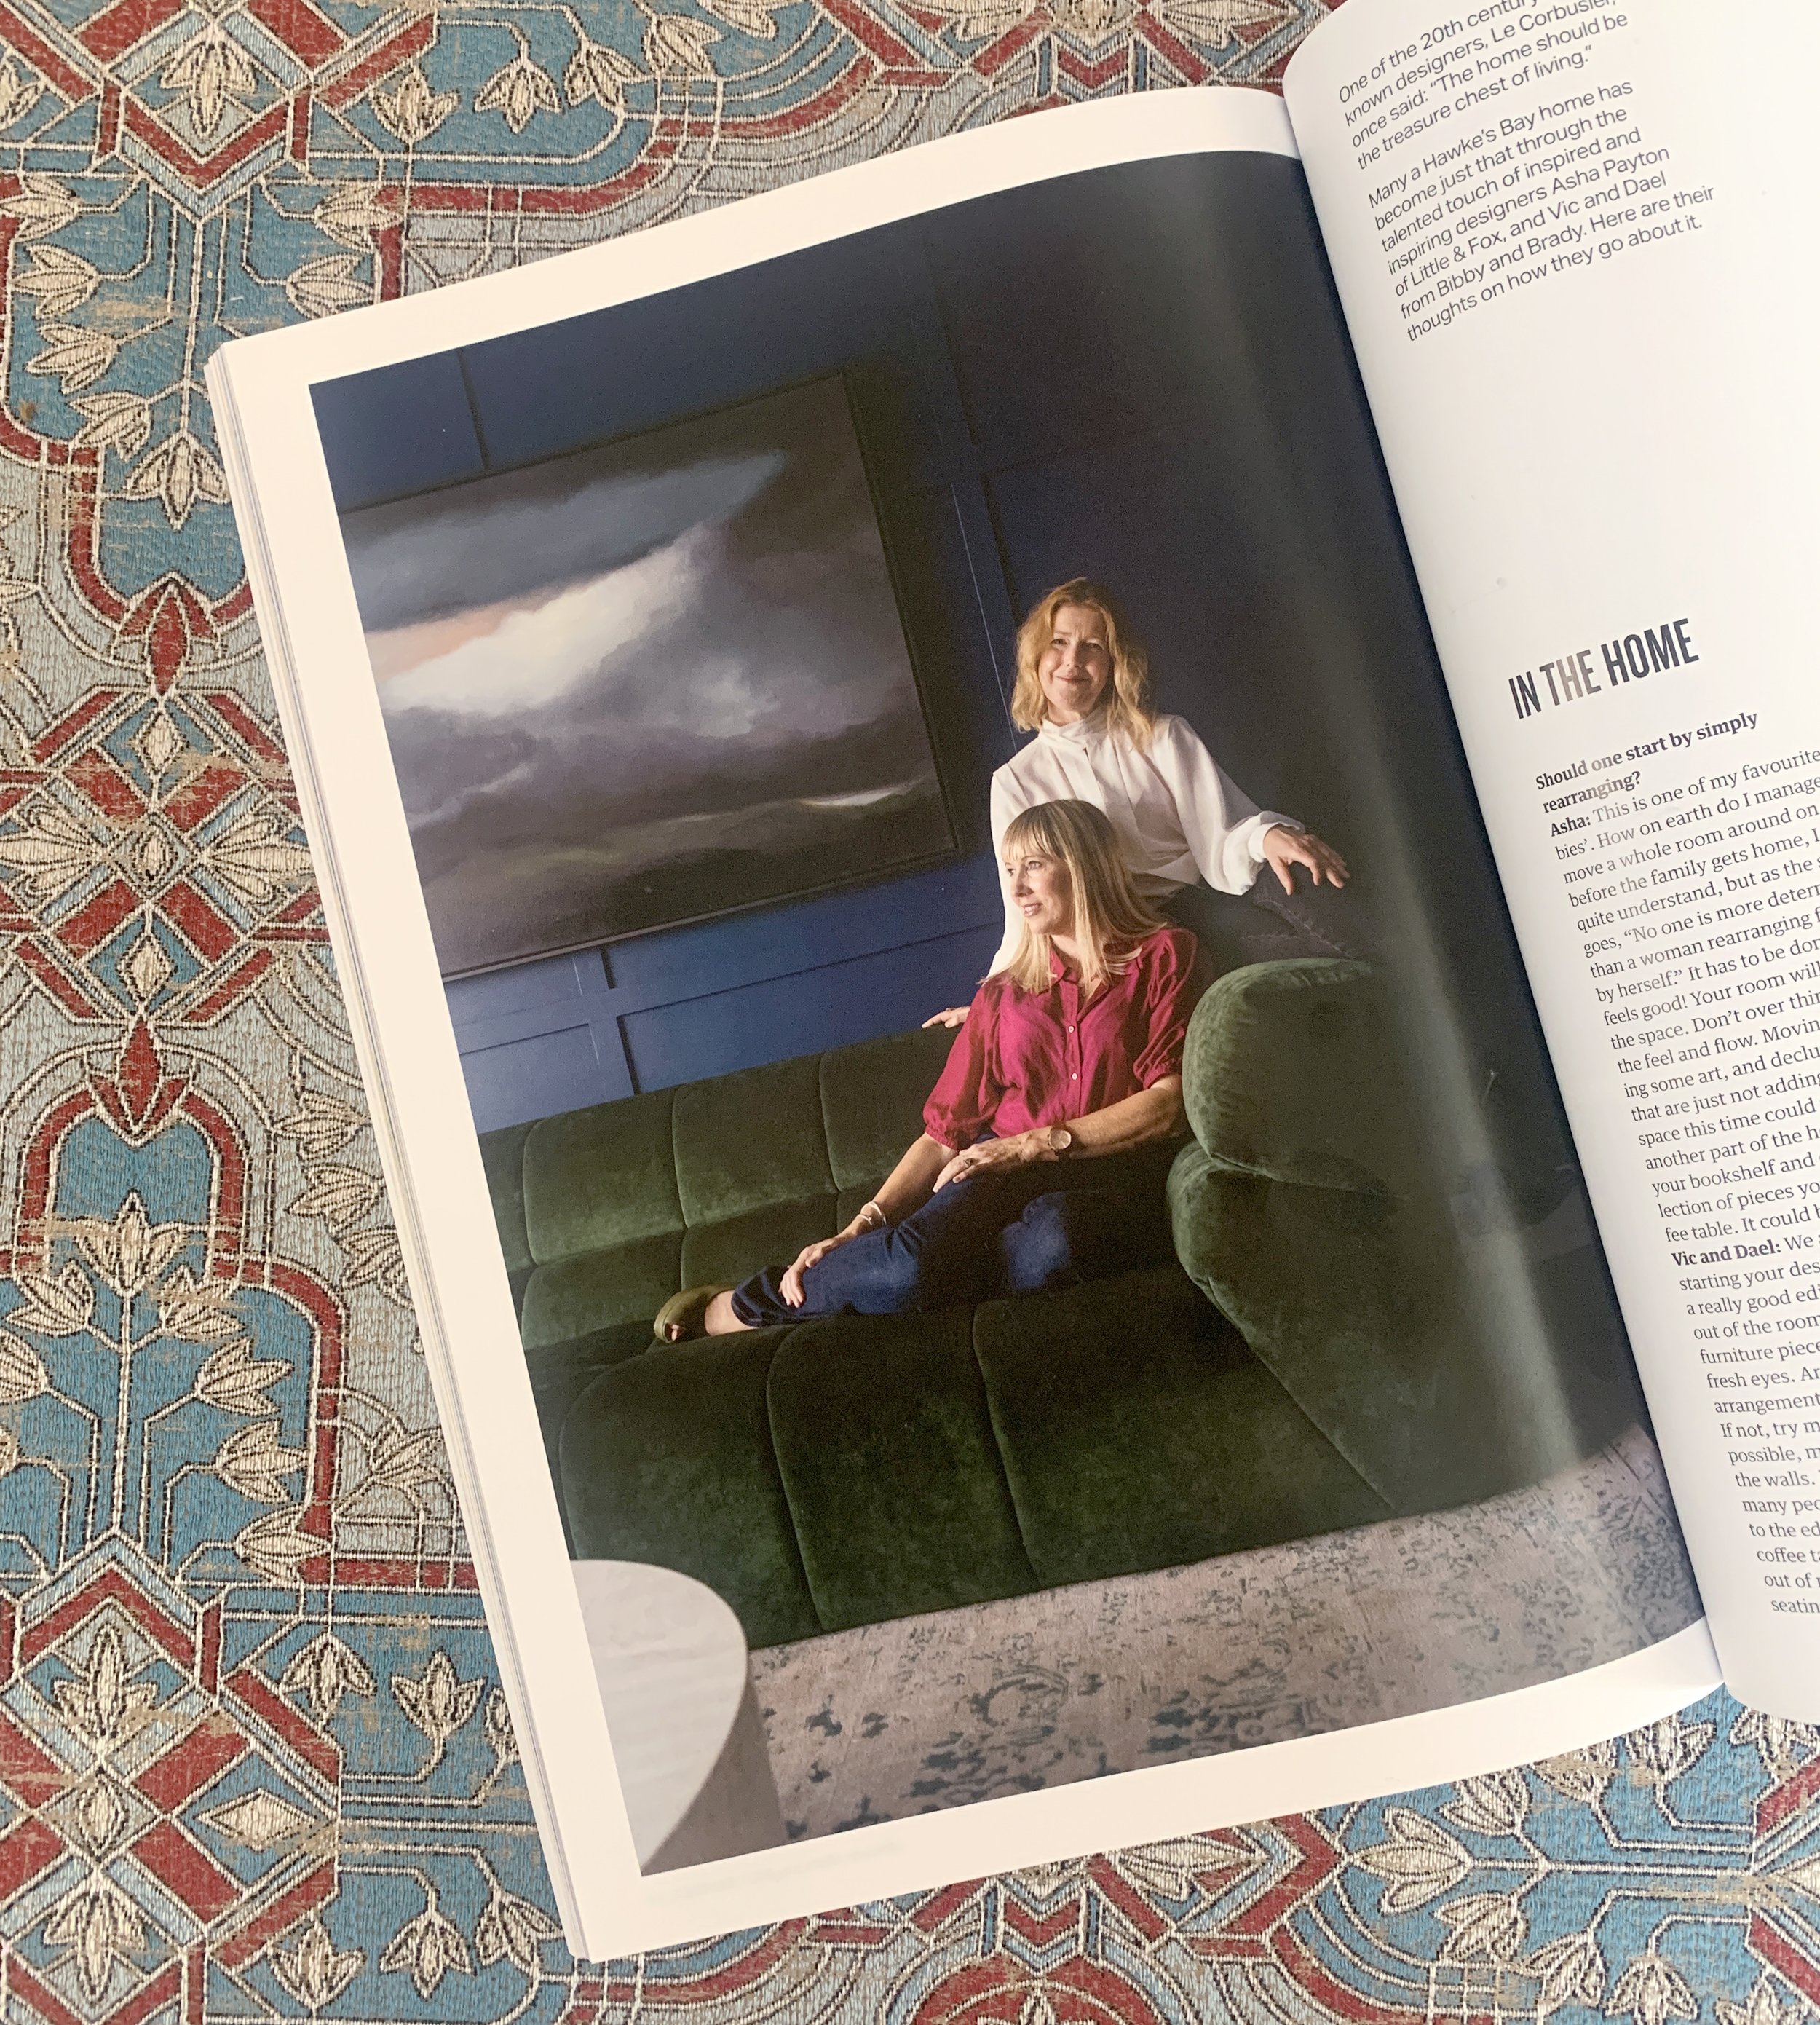
We recently appeared in the first issue of Bay Buzz for 2023 which was all about ‘refresh and renew’. It’s packed with great advice from many experts on how to refresh and renew your mind, body, career, business and home, as well as the planet. We highly recommend picking up a copy to read all about it.

The new year is a brilliant time for new beginnings and a new, fresh look for your home. We love transforming our clients’ homes and seeing the positive effect it has on them, their family and their lifestyle. We wanted to share with you some of the tips and advice we gave Bay Buzz (plus a few extra) to make changes in your home that don’t require a big, expensive renovation but can make the world of difference.

LAYOUT & FLOW : :

We always recommend starting your design process with a really good edit. Take everything out of the room except for the large furniture pieces and look at it with fresh eyes. Are you happy with the arrangement, does it have good flow? If not, try moving furniture around. If possible move furniture away from the walls. It always surprises us how many people push all their furniture to the edge of the room and have their coffee table floating in the middle out of reach and disconnected, or the seating is too far apart to function socially. If your room is large enough, try pulling your furniture in to create cosy, social settings. It might take a few moves before you get it right, and this process may also highlight areas that are lacking or need changing. For example, you may need a bigger coffee table, or to add side tables... That’s ok, this is all part of the process to get the best looking and best functioning room for you.

SHOP FROM YOUR HOME : :

Once you’re happy with your furniture layout move onto the decor. Put all of your accessories together in another space, perhaps on the dining table or kitchen bench, and ‘shop’ from your collection. Look at each piece and consider whether you would buy that if you saw it in a shop today. Only put back those pieces you love, and don’t feel you have to put them back in the same place. You may want to move some pieces to another spot or to other rooms in the house. We regularly move pieces around our homes to refresh each space.

Create groupings with your items. We like to put odd numbers of items together - 3, 5, sometimes 7 or 9. But three seems to be the magic number to keep your eye moving for a more interesting visual experience. Another way to create interest is to have a mix of shape, size and texture. Experiment and play around, there is a real skill to styling and you’ll get better the more you do it.

Books are a favourite tool of ours. We use them as plinths to ground and elevate smaller objects. They also add an element of design and reflect your interests. Look for books about things you love, but also keep in mind the colour of the book and the graphic nature of the spine and cover and how that will work in your room. Sometimes the colour of the hardback book beneath the jacket can be quite different giving you two options in the one book.

FILL THE GAPS : :

If there are any gaps after the process of shopping from your home, you now have specific pieces you can look for, so you can shop with purpose. We love that final layer in a home, it’s the one that adds your personality. Keep scale in mind. Large-scale pieces like a large lamp, balanced with a large vase add drama and interest and create a less cluttered look than a lot of tiny pieces would. We try not to have any decor pieces smaller than an orange, which is a good rule to remember. Often larger pieces make a space feel more luxurious and expensive. Give it a try.

PAINT : :

Without a doubt painting your room is the least expensive way to create impact. Look at existing pieces in your room like furniture, art, curtains and flooring and choose a colour that will be harmonious. We’ll often pull the paint colour out from one used in a piece of art or the rug.

We’re not fans of the feature wall, it’s the quickest way to make your room look dated. Instead we encourage you to go for it and paint your entire room. Don’t forget the trims and ceiling, we’ll often paint them a fresh white, but on occasion we’ll paint the trims, and even the ceiling, the same colour as the walls. If done right it looks incredible and is especially effective in media rooms and powder rooms to create a cocooning feel.
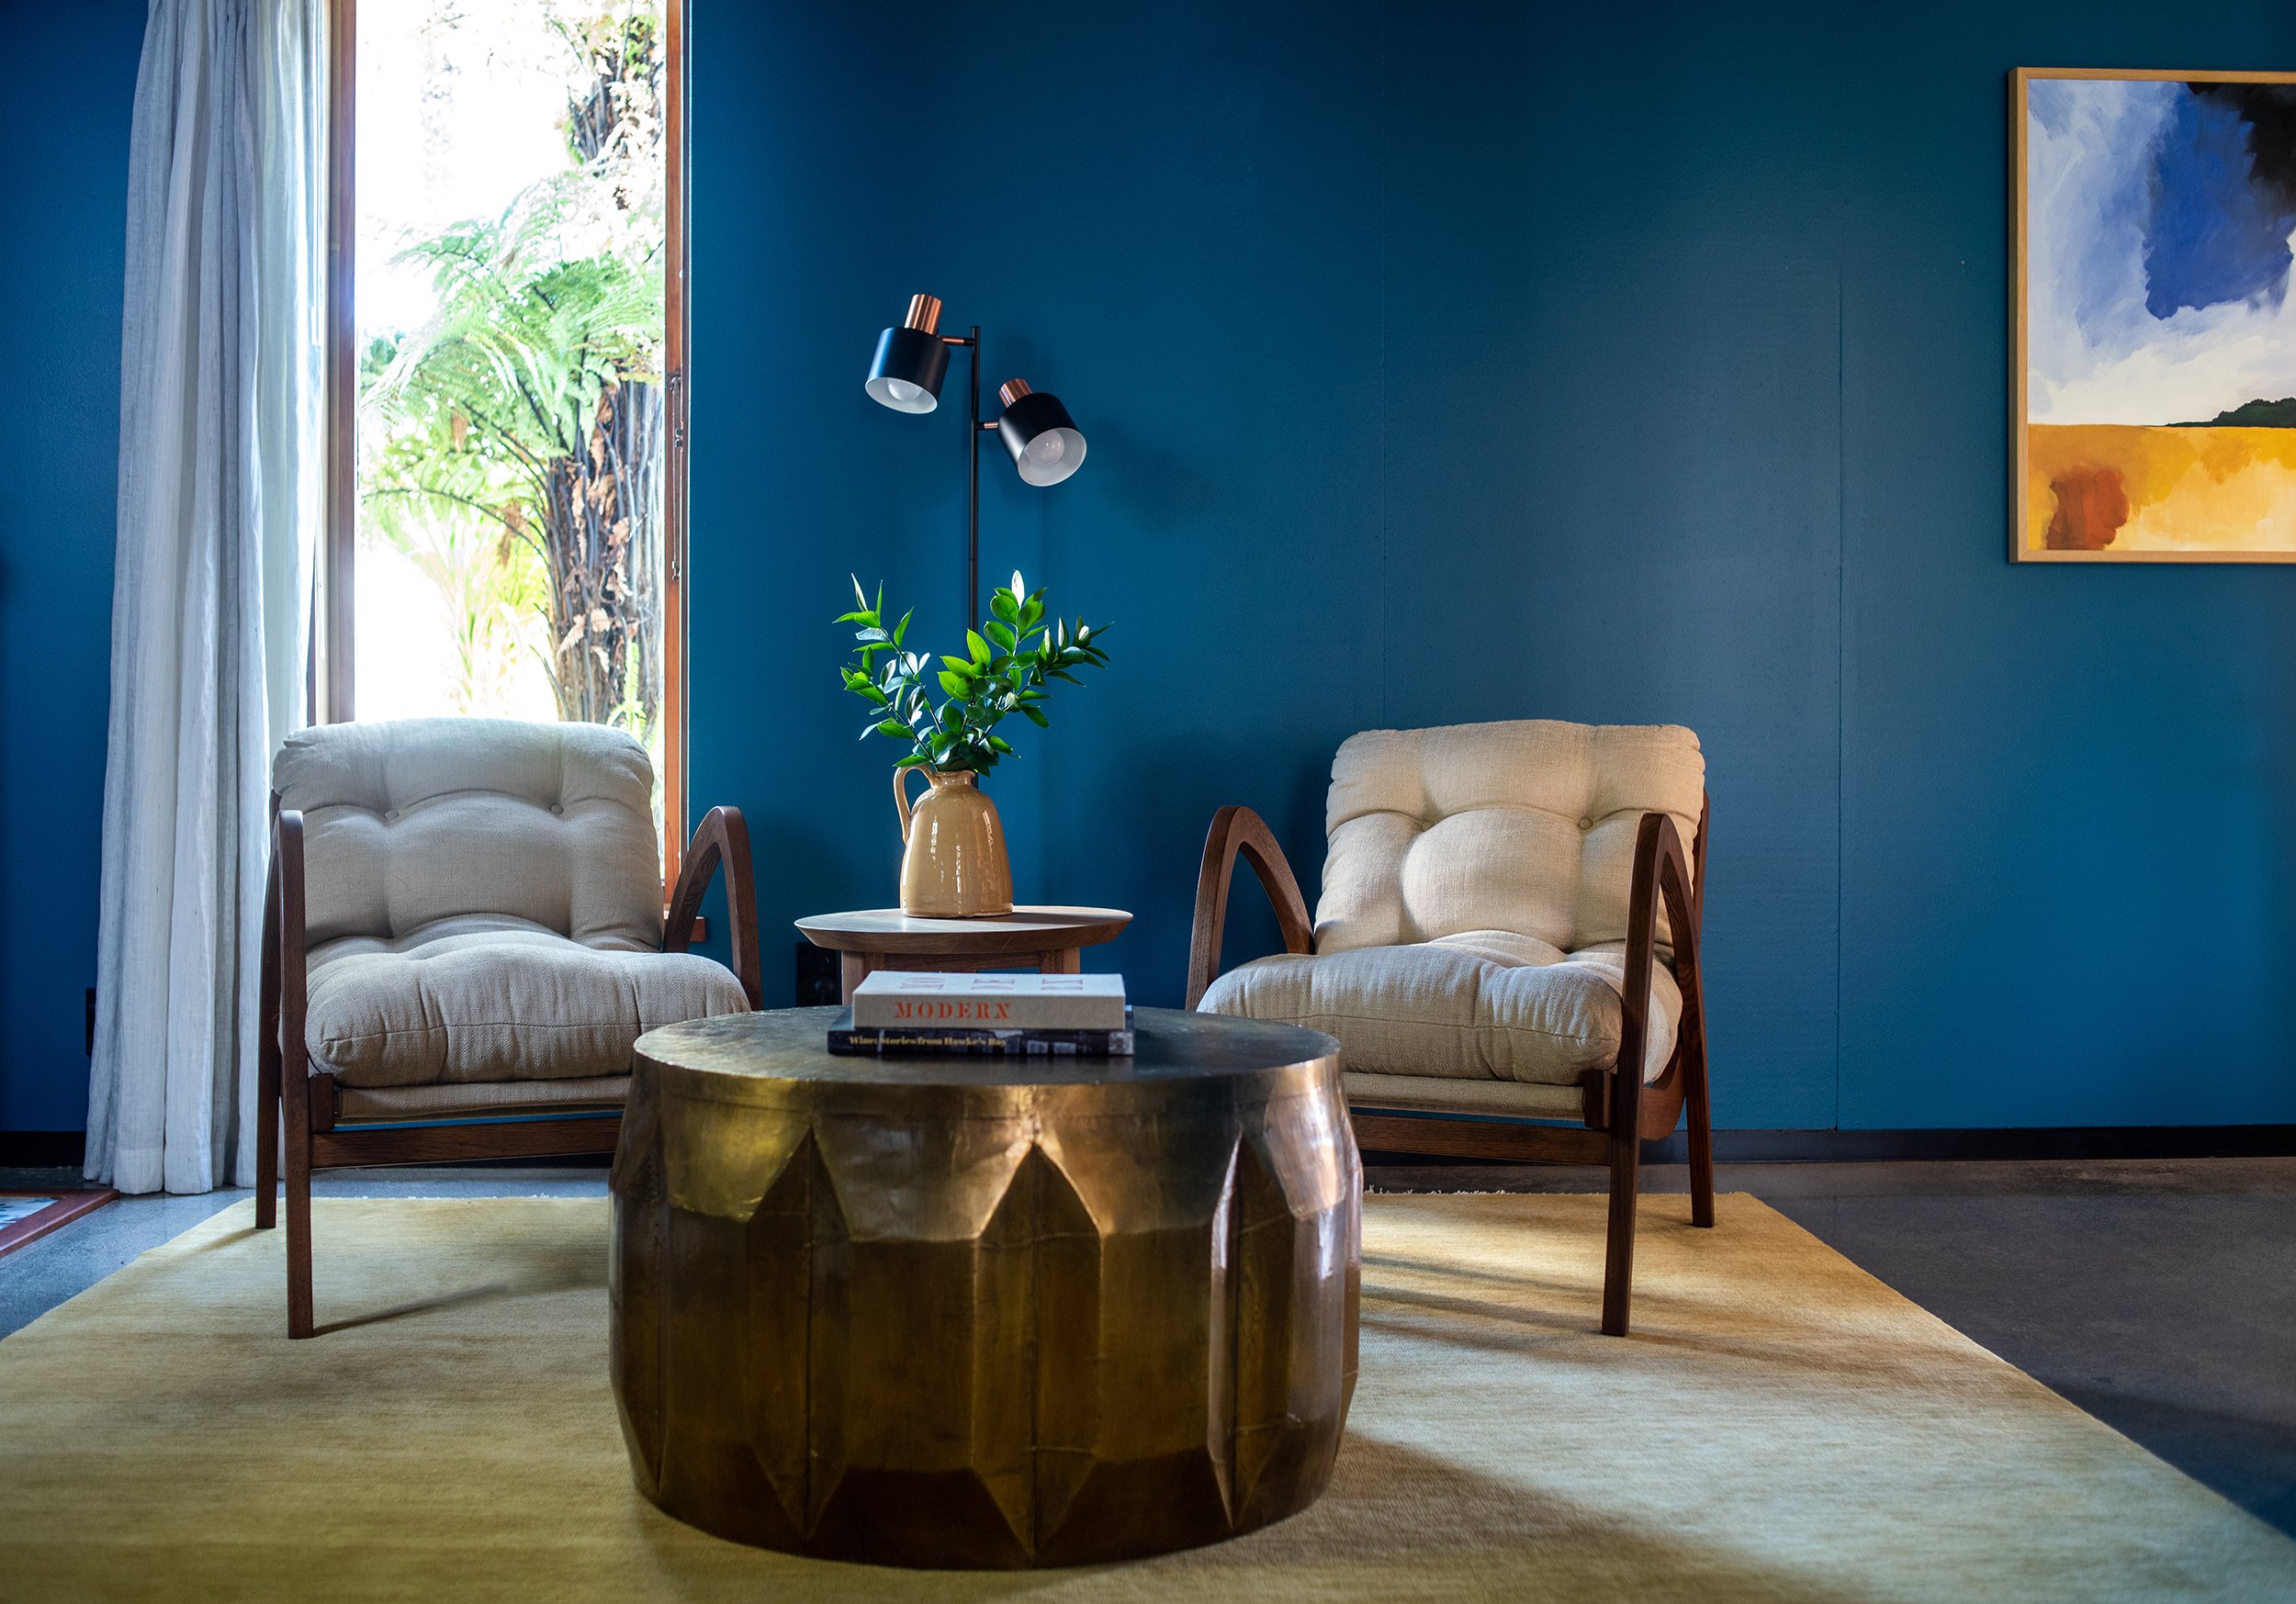
ELEVATE YOUR WALLS : :

We love to use wall paneling to elevate a room and add architectural detail in an otherwise plain room. There are lots of different styles to choose from - v-groove, box moulding, board & batten, wainscoting. The style of your home will dictate which style of panelling you choose. If you’re handy with the tools you could apply the panelling yourself, otherwise talk to your local builder or handyman.

We used a chunky box moulding in Dael’s media room (above) in her 1940’s home; and a finer, more subtle panelling for our clients’ character villa (below).

UPDATE YOUR HANDLES : :

It’s amazing what a difference an updated handle can make in your kitchen, wardrobe, dresser etc. Knobs are easy to replace as there is only one hole, but if you have a D handle measure the distance between the two centre holes and look for new handles with the same centre handle distance. This will save you having to fill holes if the new handles are a different size.

Overhead cupboards in the kitchen can sometimes look more contemporary if you take the handles off completely, fill, sand and paint them and add a push-to-open mechanism on the inside.

INVEST IN NEW LIGHTING : :

Replacing old pendants and lamp shades can change the look of a room quite dramatically. If possible add dimmers to your lights so you can create different ambience for different situations. Make sure to hang your pendants at the right height. This will be dependant on factors such as the scale of your light and the height of your ceilings. Kitchen pendants will often be hung 70-80cm above the bench, and over a dining table we’ll start with 75cm higher then your table top. Each space will be slightly different, we use our eye to get it just right, but these are good measurements to start from.

INVEST IN A RUG : :

The right rug can totally transform a room, but the key is to get the right size. Don’t get a tiny rug that your coffee table fits on but nothing else. This is the quickest way to make your room look too small and cheap. The golden rule is that the front feet of all of your chairs and sofas sit on the rug. If all of the legs fit on, even better, this will make your room look really spacious.

Under your dining table the rug needs to be large enough to pull the chairs back without them falling off the rug. Yes the larger the rug, the larger the price tag, but it’s something we would recommend getting right. If a hand knotted wool rug is outside of your budget, start with a large jute rug.

I hope you found some advice that you can apply to your own home. We’d love to hear about it if you did - feel free to DM us on Instagram. And if you’d like our help with your interior design journey, whether that’s a new build, or renovation, or just sourcing new furniture, get in touch anytime.

Goldsmith | Before + Afters

We recently finished an amazing kitchen/dining room project. Despite having to deal with lockdowns, supply delays and shortages, it was a fantastic project to work on. It helped that our clients are two of the loveliest people, and we had a great team helping us create our vision.

Our clients have a beautiful architecturally designed home and the kitchen was still in pretty great condition, even after 17 years. But they were ready for a re-fresh and more storage was on the wishlist.

The original kitchen was a U-shape tucked into one end of the room with the dining table taking up a large part of the open-plan space. They have a magnificent view over Napier on the opposite side of the room and the first thing we wanted to do was to capitalise on that by spinning the kitchen around to face the view, also giving our clients a more spacious kitchen to work in.

Because we were proposing quite a radical change to the layout, it was helpful to show our clients 3D renders so they could clearly see our vision, and there was no guesswork involved. It’s also a very important part of our process as it’s a lot easier (and cheaper) to make changes to the renders rather than making physical changes once construction has started. You can see more of our renders here.

Because the kitchen was the first space you see as you enter this open plan living area we wanted the joinery to feel like built-in furniture. When the teak veneer that we wanted to use wasn’t available our joiner, Kakapo Joinery, took an oak veneer and created a series of test pieces with different stains to create the richness we were after for the back lineup. The island has a black stain and we fluted this to add subtle texture.

Because there are a lot of architectural details in the home we wanted to keep aspects of the design clean and simple so we opted for handleless, push-to-open drawers and cupboards. The large pantry required handles, though, as it has pocket doors that can be opened and pushed right in so as not to interrupt flow in the kitchen. So we asked Kakapo Joinery to create gorgeous handles from solid oak that ran the entire height of the pantry for an inconspicuous solution.

In the original design the dining room took up a lot more floor space. Our kitchen design ate into that floor space quite considerable and so required a clever solution.

The hutch dresser could go as the large new pantry and multitude of wide, deep drawers provided ample storage. We then gained valuable space by designing a dining banquette along the back two walls, flowing seamlessly onto the kitchen cabinetry. A new, custom made table could then tuck right up against the banquette.

As we progressed with the dining area we asked Robin from Kakapo Joinery to make a dummy table top to try in-situ on the base so we could get the size and scale just right. Again, it’s more cost effective to make a change to the ply ‘dummy’ top than the real oak top.

Dael (below) is trying it out for size. Note: she is sitting on a cushion to make sure she’s getting a more accurate feel for the finished design. How many cafes have you been to where the bench seating feels too high for the table? That’s because it seems to be a common mistake to make the bench the full height not taking into account the cushion or squab. We use a 100mm thick foam in our squabs, so we need to make the base of our banquettes 100mm shorter.

One of the architectural details of the home was a shelf that ran along the back of the room. When it came to our banquette design we were able to run the back support directly under this so that the shelf could still be used. The upholstery was made by the amazing team of Martin & Ivan and is a gorgeous faux leather.

Another of the home’s architectural features was a lot of angles with different levels and depths. We wanted to simplify this slightly and so the back cabinetry hides a lot of that with a bulkhead above.

We didn’t want to completely loose the subtle angle of the back wall, but we were also trying to avoid any further sharp angles. So Kakapo Joinery created a really beautiful subtle curve in the lower cabinetry, which you can see in the progress image below. In fact all of the curves in our design were introduced to contrast and soften the various angles in the architecture.

We chose to use Corian® as the benchtop material for a number of reasons. We loved the gorgeous organic swirling pattern in caramel and cream tones. It’s a great product to use on curves, and it offers nearly seamless joins.

With the focus on the kitchen being the back lineup in the warm teak-stained oak, we wanted the overhead cupboards (which include a hidden powerpack) to sit quietly. By painting them the same white as the walls they don’t demand too much attention.

The finger tiles are Japanese inspired and we love the repetition of texture and clean vertical lines.

A couple of hidden features we love in the kitchen design, along with the pantry pocket doors, are the interior of the drawers and cupboards which we made black instead of the usual white for an elevated finish. And the hidden corner cupboards on the island. Check out our Instagram Story highlights to see more.

To our clients… thank you so much for allowing us to share these photos and our journey. But most of all for being fabulous clients and trusting us even when we pushed you out of your comfort zone. We recently learnt that the feature that had most worried our client was the built-in banquette, but she trusted our design and bravely went there! Now (as we always find) the part she was most worried about is one of her favourite things. May all our future clients be as brave and trusting :)

Dael's Kitchen, Dining, Living | Before & Afters

Dael and Lee bought their two-storey home in a great location, close to their girls’ school and with a lovely back aspect out over a tree-filled valley. Dael describes it as a “head” decision, not one made from the heart. She knew the location, size and price point was right for them. The house itself, however, was in need of some work, particularly in changing the layout and flow to make it more functional for their family. The main living area was broken up into the kitchen, a small dining room tucked in between two walls, a large laundry and utility space, and a living room with a separate adjacent sunroom.

You can see how the original kitchen (below) had the breakfast bar facing the living room, but Dael felt like it was encroaching into the living space. She wanted to pivot the kitchen towards the dining area and the outdoors. So the entire kitchen was ripped out and a new galley style kitchen designed.

Dael chose her bench top about a year before when we were visiting the Archant showroom in Auckland. She fell in love with the beautiful porcelain material that looks like stone but has the flexibility to be able to put hot things onto it straight from your oven. She chose a marble look with warm gold veining and created a waterfall end so you can appreciate it’s beauty as you walk into the room, as well as from the living room.

By running the porcelain up the wall behind the cooktop, as well as on the bench top, it creates a clean, seamless look and shows off the beautiful, subtle pattern.

To bring some warmth into the kitchen Dael chose a gorgeous rich wood veneer for the back line up of cupboards. Some people mistakenly assume that wood veneer is an inferior product to solid wood, but we’re here to tell you that’s not the case. It’s environmentally kind - you get 32 veneer surfaces for every solid wood board. The thin (real) wood veneer surface is then glued onto a MDF panel, and because this is a stable substrate it produces a surface that is not prone to warp, split or move. And, the best and most interesting logs are cut into veneers.

The cupboard on the left is a tall pantry, and on the right the fridge is hidden behind another cupboard front for a seamless look, which is great in a small kitchen. Simple brass handles sit flush to the edge of the cupboards to continue the clean lines. A thin LED strip light below the overhead cupboards and under the breakfast bar adds a lovely glow washing down. The front of the breakfast bar is a blackened oak veneer to add a touch of weight to the room.

The new breakfast bar is now positioned in the spot Dael had previously put her dining table (below), taking advantage of the view outside.

The one thing that Dael’s husband, Lee, requested in the new kitchen was a tap that supplied them with hot, cold and boiling filtered water. It’s now something that Dael says she couldn’t do without. It means they don’t need a kettle anymore, and they both love the convenience of having boiling water on tap. But also not having the noise of a kettle in an open plan space has made a really positive difference.

There’s a clear division now between the kitchen and living room, even though it’s all open plan. You can see in the photo below how the barstools were actually on the carpet in the living room.

In the original layout there was a separate sunroom on the front of the living room. It was quite narrow and the family weren’t really using it. So the wall was taken down allowing not only more space, but also a lot more light in the room. The little French doors were kept and repurposed in the new dining room. The old carpet was taken up and the floors between the two living spaces levelled out before new carpet was laid.

Because the window faces the street, Dael installed a double track for her curtains. A semi-sheer curtain is pulled all of the time for privacy, but still lets in light; and in the evening the bottom curtain is pulled for warmth and blockout.

The previous owners had their dining table in the little nook (below) which is opposite the kitchen, and on the other side of the wall, that window led to a laundry and utility space.

Dael and Lee knocked down that wall and relocated the laundry to a large downstairs bathroom. The French doors from the sunroom were put on the old laundry space which is now used as a kitchen overflow cupboard where Dael keeps all her large appliances, platters and vases.

The old dining nook is the perfect spot for the buffet, and we love a good buffet for creating some styling moments!

Leaning art and mirrors rather than hanging them creates a relaxed vibe and allows you to move them around and change your look from time to time. If you’ve watched any of our videos you’ll know that we love trays for grouping and grounding smaller objects.

In this ‘before and after’ you can see the relationship between the different spaces, and how, by knocking out some walls and re-orientating the kitchen, the flow and usability is now so much better.

The final part of the downstairs renovation puzzle for Dael and Lee was the hallway that leads from the front door and bedrooms down to the kitchen, dining, and living rooms. The old carpet was ripped up and the floorboards polished, whilst the wooden steps were carpeted making them so much more quiet. Dael had her builder add battens for a board and batten effect on the walls creating some interest to an otherwise fairly plain space. The large artwork is by our friend and talented photographer Florence Charvin. The custom Armadillo&Co runner from The Ivy House leads you down to the stairway, which is wallpapered in a beautiful Arte paper. The finishing touch is the addition of the stunning lights by David Trubridge.

To summarise, Dael, Lee and their girls are now so much happier with their home. It’s amazing the effect good design and good flow can make on your everyday life!